Managed Kubernetes Backups on cloud environment
What We Are Going to Cover
The importance of Kubernetes backups
Kubernetes backups are relevant in many scenarios:
Disaster recovery – restore a broken cluster to a known-good state.
Migration – move workloads between clusters.
Application rollback – undo failed deployments or upgrades.
Testing and development – clone production workloads into a test cluster.
Compliance – maintain historical snapshots for audit purposes.
A proper Kubernetes cluster backup should capture the complete state of the cluster, including default Kubernetes resources, custom resources, and the interactions between them, so that the cluster can be quickly and reliably redeployed if needed. In addition to cluster state, it is also important to consider persistent volumes and their backups, since application data often resides there.
What is Velero
To solve this challenge, the Kubernetes community uses Velero, an open-source tool with Apache License 2.0. Velero:
backs up cluster objects and persistent volumes, and restores them when needed,
stores backups in S3-compatible object storage for portability and cost efficiency,
uses Kubernetes-native resources to declare and reconcile backup state.
In Managed Kubernetes, the Managed Kubernetes Backups feature installs the Velero operator on the cluster automatically and provides a graphical interface to manage backups.
This means you can enable and schedule backups without writing YAML or managing Velero directly. Under the hood, the familiar Velero mechanisms are at work, and when you need to restore a backup, you will use the Velero CLI to drive the process.
Backup options
You can configure and run Velero cluster backups yourself using the Velero CLI directly. Alternatively, Managed Kubernetes lets you enable Velero backups in a simpler way, with a predefined subset of features. Under the hood, this feature enables a Velero operator on the cluster.
The table below summarizes the differences between the two approaches so you can choose the right one for your workflow.
With Managed Kubernetes Backups |
With Velero directly |
|---|---|
Automatic Velero installation, Velero CLI needed only for restore |
Both Velero CLI and Operator installation needed for all operations |
Simple backup scheduling daily, weekly, or custom cron |
Full scheduling customization via YAML |
S3 bucket and credentials auto-provisioned |
Any supported S3 location, configurable manually |
Restore not exposed in GUI |
Restores done with velero restore create and describe/log commands |
Limited to preset options |
Advanced features in line with full Velero capability |
Prerequisites
No. 1 Hosting account on cloud environment
To use Managed Kubernetes, you need:
a general cloud environment account https://my.cloud.eumetsat.int
access to the Managed Kubernetes dashboard at https://mks.cloud.eumetsat.int/
No. 2 A Managed Kubernetes cluster with kubectl access
If you need to create one, see How to create a Kubernetes cluster using the Managed Kubernetes launcher GUI.
This article assumes a running Managed Kubernetes cluster that you can administer and connect to with kubectl. Export your kubeconfig and secure it:
export KUBECONFIG=/path/to/your/config
chmod 600 "$KUBECONFIG"
kubectl get nodes
If kubectl cannot reach the cluster, fix this before proceeding.
No. 3 Supported Managed Kubernetes region
Backups, Velero configuration, generated S3 buckets, and restore workflows are region-specific. Use a cluster in a supported Managed Kubernetes region.
Available Managed Kubernetes regions for cloud environment:
R1
R2
FRA1-3
No. 4 Velero CLI on your workstation
You need the Velero CLI only for advanced operations, especially restore workflows. You do not need it to enable backups in the Managed Kubernetes GUI.
Install the Velero CLI:
curl -LO https://github.com/vmware-tanzu/velero/releases/download/v1.16.1/velero-v1.16.1-linux-amd64.tar.gz
tar -xzf velero-v1.16.1-linux-amd64.tar.gz
sudo mv velero-v1.16.1-linux-amd64/velero /usr/local/bin/velero
Verify the local client installation:
velero version --client-only
Expected output:
Client:
        Version: v1.16.1
Note
On managed clusters, velero version may fail to display the server version before the managed Velero components are fully installed. Use velero version –client-only to verify the local CLI. Use kubectl checks later, after backups are enabled, to verify the in-cluster Velero installation.
No. 5 Matching Kubernetes version for cross-cluster restore
If you plan to restore a backup onto a new cluster, create the destination Managed Kubernetes cluster with the same Kubernetes minor version as the source. Cross-version restores may work, but are not guaranteed for all CRDs.
Before you start – quick checklist
You can reach the cluster with kubectl. The command kubectl get nodes works.
You have access to the Managed Kubernetes GUI and can open the cluster’s Backups tab.
If you plan to test restore workflows, the Velero CLI is installed locally. The command velero version –client-only works.
You know the region where the source cluster is running.
You understand that the backup bucket details and S3 endpoint are generated only after you enable cluster backups.
Environment notes
Managed Kubernetes automatically installs and manages the in-cluster Velero setup when backups are enabled.
Do not modify Velero resources directly with kubectl or velero for routine tasks such as schedules, retention, or volume settings, because Managed Kubernetes may overwrite them.
If you need a fully custom Velero configuration, first disable Managed Kubernetes Backups and then deploy your own Velero instance separately.
To directly inspect backup objects, you can install an S3 client on your workstation, such as boto3 or s3cmd.
The cluster must have at least one worker node running for the backup process to operate. To delete the last node pool from a cluster, you must first disable backups.
Volume backup considerations
Velero can back up Persistent Volume Claims (PVCs) in addition to Kubernetes resources. Be aware that:
backups of large volumes may take minutes or hours to complete because files are copied into S3,
to improve consistency, schedule backups during low activity or quiesce applications, for example by using a database flush, lock, or maintenance mode,
when restoring, the backup reflects only the state at the moment of capture. Writes happening during the process may be lost.
Enable cluster backups on the cluster
Before you can verify the managed Velero installation or use the generated backup storage values, you must enable cluster backups.
Click the cluster in the cluster list, then go to the Backups tab.

Select the Enable cluster backups checkbox. An additional dialog appears:
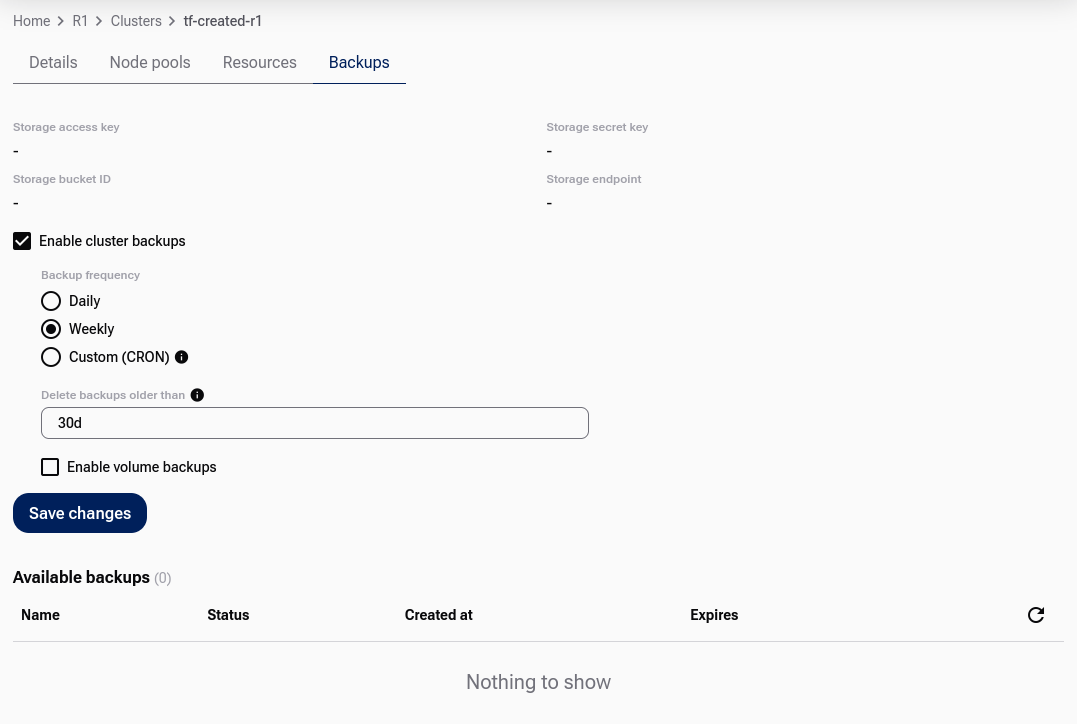
You can customize the default settings:
select the backup interval: daily, weekly, or custom cron,
select the period after which historical backups will be automatically removed,
define whether Persistent Volume Claims (PVCs) should also be captured by the backup.
When ready, click Save Changes. The platform generates the storage access key, storage secret key, storage bucket ID, and storage endpoint:
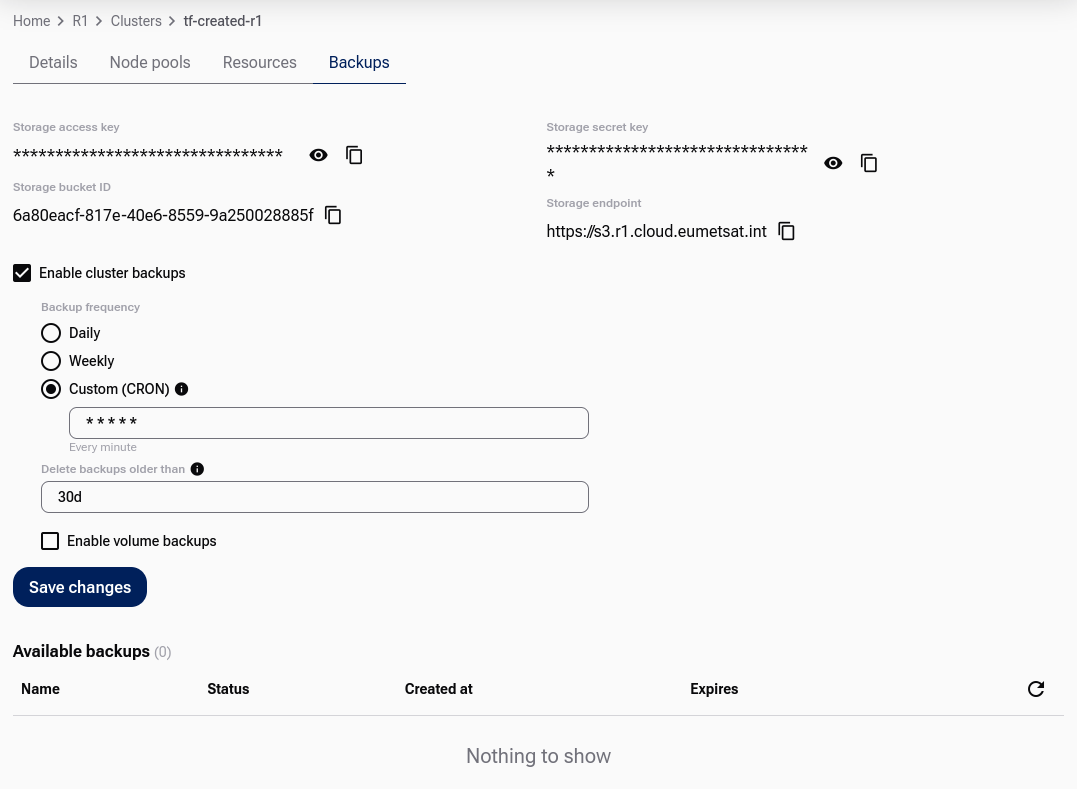
Save all four values for future reference:
Storage access key
Storage secret key
Storage bucket ID
Storage endpoint
The S3 backup storage values are not available before backups are enabled. They are created by the managed backup setup and are required later for restore workflows, especially if you restore backups onto another cluster.
Important
Save these four values immediately after they are generated. You may need them later to register the backup location on a different cluster.
The backups are stored in this bucket in your cluster project as files in Velero format. You can access them with the Velero CLI once your kubeconfig points to the cluster.
Alternatively, you can access them directly over S3 using the endpoint and keys.
Once backup activation starts, the cluster may enter the  state:
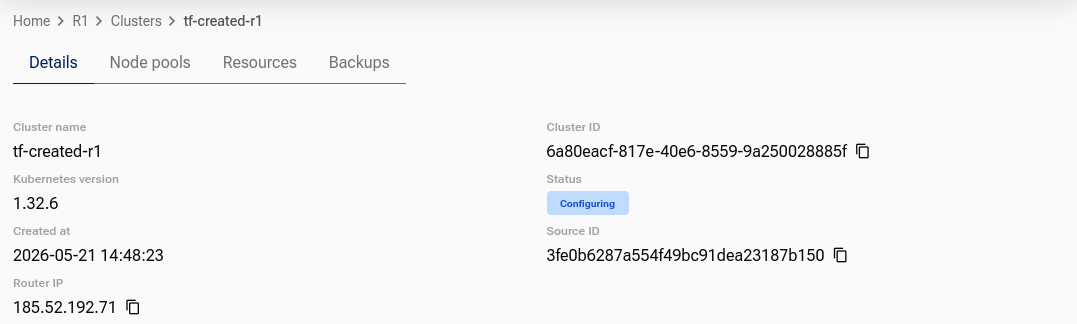
Wait until the configuration process finishes before you verify Velero with kubectl.
Verify that Velero was installed
Run these checks only after you have enabled cluster backups and the cluster has finished the configuration process.
kubectl get ns | grep -i velero
kubectl get pods -A | grep -i velero
kubectl get crd | grep -i velero
kubectl -n velero get deployment,pods
In a correctly configured backup setup, you should see the velero namespace, Velero pods, and Velero custom resource definitions.
If the command:
kubectl -n velero get deployment velero
returns:
Error from server (NotFound): namespaces "velero" not found
then Velero has not been installed on the cluster. In that case:
check that Enable cluster backups is still selected in the Managed Kubernetes GUI,
check whether the cluster is still in the
state,check whether the backup bucket, access key, secret key, and S3 endpoint were generated,
wait until the configuration completes,
if the namespace is still missing, disable backups and enable them again, or contact Support.
Do not continue with restore commands until Velero is visible in the cluster.
How to create your first cluster backup
With Daily or Weekly selected, the first backup may not appear immediately in the Available backups list.
Caution
If you want to see a cluster backed up right away just for testing the feature, use the third option, Custom (CRON), with five asterisks as the input:
That creates a cron job that repeats every minute. The positive side is that it creates the backup immediately. The negative side is that it continues doing so, which can quickly exhaust your project storage quota.
Warning
Once you have created a new backup for testing purposes, switch back to a more reasonable production setting, for example Daily or Weekly.
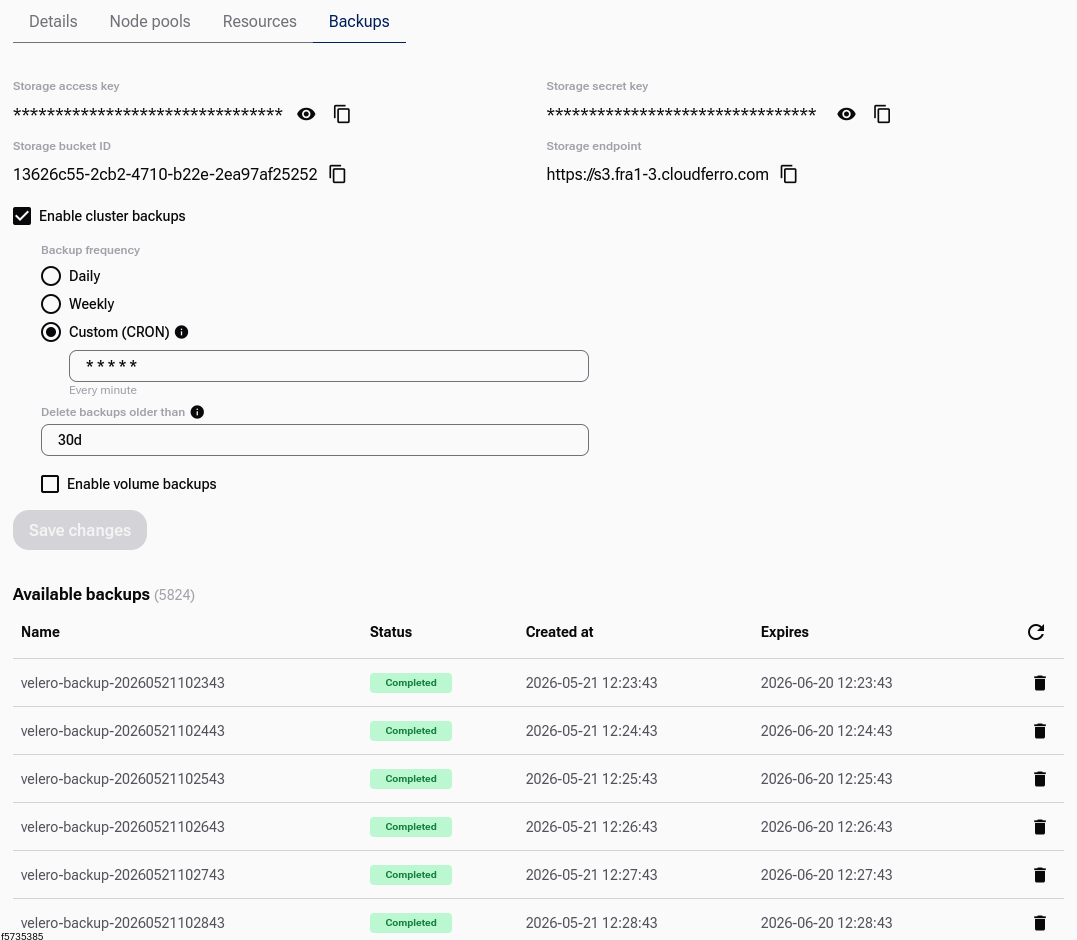
You will see the backups in the Available backups list at the bottom of the screen.
Clicking the backup name redirects you to the YAML definition of this specific backup in the Cluster Resources tab.
Change the backup settings
You can change backup settings by modifying backup parameters such as frequency, retention, and whether to include volume backups.
These settings affect only future backups. Historical backups are not changed.
List and delete backups
When a backup completes, it appears in the list at the bottom of the Backups screen. Therefore, listing the available backups is automatic when using the GUI:

Delete using the GUI
Review available backups in the Backups tab.
If needed, click a backup name to view its YAML in Cluster Resources.
Click the recycle bin icon to delete an individual backup.
About deleting with CLI
Note
With Managed Kubernetes backups, the GUI is sufficient for enabling, scheduling, and deleting backups. You typically need the Velero CLI only for restore workflows.
To remove older backups in bulk:
keep Enable cluster backups turned on so Velero can manage them,
delete the individual backups you no longer need,
then disable backups if you no longer want new backups to be created.
Restore a backup on the existing cluster
Restoring a backup on the existing cluster is a valid scenario when the cluster is functioning properly and you want to revert to a previously captured state.
To restore the backup, you need the Velero CLI on your local machine. See Prerequisite No. 4.
Ensure your Velero CLI runs in the context of this cluster, for example through the exported KUBECONFIG environment variable. Also ensure that cluster backups are enabled on this cluster and that the velero namespace exists.
To restore from a specific backup, for example velero-backup-20250915093400, run:
velero restore create restore-backup-20250915-01 \
  --from-backup velero-backup-20250915093400
Unless you specify –namespace, Velero assumes the velero namespace.
Under the hood, this command creates Velero’s Restore custom resource. The Velero operator installed on the cluster reconciles the cluster to the state defined in this resource.
For more details, see the Velero documentation. You can use additional flags to customize how the restore is performed.
To check restore progress and details, run:
velero restore describe restore-backup-20250915-01
velero restore logs restore-backup-20250915-01
Restore a backup on a new cluster
Sometimes the original cluster, Cluster A, may no longer be accessible.
In such a case, you can restore its backups onto a new cluster, Cluster B.
Keep these points in mind:
Cluster B must run the same Kubernetes minor version as Cluster A.
Velero CLI must point to Cluster B, so your kubeconfig context must be switched.
Velero must be installed on Cluster B. In the managed workflow, this means enabling cluster backups on Cluster B first, so that the managed Velero components are created.
Velero needs access to the S3 bucket containing the backups. In most cases, this is the bucket from Cluster A, but it can also be another S3 location if you saved backups elsewhere before deleting Cluster A.
Prefer restoring to a cluster in the same region as the backup bucket. If you restore across regions, use the exact S3 endpoint generated for the original backup location and verify network access.
Step 1 – Point CLI to Cluster B
From the GUI, copy the kubeconfig file from Cluster B’s Cluster Details and store it under the name clusterB_config.yaml.
export KUBECONFIG=/path/to/clusterB_config.yaml
chmod 600 "$KUBECONFIG"
kubectl cluster-info
velero version --client-only
This ensures that all following commands target Cluster B.
Enable backups on Cluster B and wait until the cluster finishes the configuration process. Then verify that the managed Velero installation exists:
kubectl get ns | grep -i velero
kubectl get pods -A | grep -i velero
kubectl get crd | grep -i velero
kubectl -n velero get deployment,pods
Step 2 – Provide S3 credentials
Velero must authenticate to the S3 bucket that holds the backups from Cluster A.
Create a credentials file on your workstation:
cat > credentials-cluster-a <<'EOF'
[default]
aws_access_key_id=YOUR_ACCESS_KEY
aws_secret_access_key=YOUR_SECRET_KEY
EOF
Replace YOUR_ACCESS_KEY and YOUR_SECRET_KEY with the storage access key and storage secret key generated for Cluster A.
Create a Kubernetes secret in the velero namespace on Cluster B:
kubectl -n velero create secret generic cluster-a-s3-credentials \
  --from-file=cloud=credentials-cluster-a
This secret is later referenced by the BackupStorageLocation.
Step 3 – Register the backup location
Now create a Velero custom resource called BackupStorageLocation on Cluster B. This resource points to the S3 bucket where backups from Cluster A are stored.
Important
Always create a new BackupStorageLocation, for example cluster-a-bsl.
Do not overwrite the default location in Cluster B. It will be reset whenever backup settings are updated in the GUI.
Use the tab that matches the region and S3 endpoint of the backup bucket:
velero backup-location create cluster-a-bsl \
  --provider aws \
  --bucket YOUR_BUCKET_ID \
  --config region=default,s3ForcePathStyle=true,s3Url=https://s3.r1.cloud.eumetsat.int \
  --access-mode ReadOnly \
  --credential cluster-a-s3-credentials=cloud
velero backup-location create cluster-a-bsl \
  --provider aws \
  --bucket YOUR_BUCKET_ID \
  --config region=default,s3ForcePathStyle=true,s3Url=https://s3.r2.cloud.eumetsat.int \
  --access-mode ReadOnly \
  --credential cluster-a-s3-credentials=cloud
velero backup-location create cluster-a-bsl \
  --provider aws \
  --bucket YOUR_BUCKET_ID \
  --config region=default,s3ForcePathStyle=true,s3Url=https://s3.fra1-3.cloudferro.com \
  --access-mode ReadOnly \
  --credential cluster-a-s3-credentials=cloud
Replace:
YOUR_BUCKET_ID with the storage bucket ID generated by Managed Kubernetes Backups for Cluster A,
S3_ENDPOINT with the storage endpoint generated by Managed Kubernetes Backups for Cluster A, if you are using the generic command.
Verify that the backup location is visible:
velero backup-location get
Then verify that backups are visible:
velero backup get
All backups are stored in the velero namespace by default.
Step 4 – Restore the backup
Choose one backup from the list and restore it:
velero restore create restore-202509173400 \
  --from-backup velero-backup-20250915093400

To monitor the restore:
velero restore describe restore-202509173400
velero restore logs restore-202509173400
Note for restoring Services of type LoadBalancer
When you restore a LoadBalancer Service with Velero, either to a new cluster or after deletion, it still points to the old load balancer. The Service will not work until a new load balancer is created. To allow the cloud controller to provision a fresh LoadBalancer with a new floating IP, remove the old OpenStack-specific annotations from the Service.
For example, if your Service is named nginx, run:
kubectl annotate service nginx loadbalancer.openstack.org/load-balancer-address-
kubectl annotate service nginx loadbalancer.openstack.org/load-balancer-id-
After a short while, a new LoadBalancer is created and the Service becomes available again.
Caveats
When you delete the cluster, backups linked to this cluster may be deleted as well. If you want to keep such backups, copy them to your own external location, for example to an S3 bucket available from your OpenStack project.
Cluster backups must be enabled before the managed Velero installation and generated S3 backup values become available. Do not look for the backup bucket, keys, endpoint, Velero namespace, or Velero pods before enabling the backup feature.
Cluster backups must be enabled to perform operations involving the backups, for example deleting historical backups. Under the hood, turning on cluster backups ensures that Velero is active on the cluster.
We strongly recommend not using the Velero CLI to tweak settings of cluster backups initiated from Managed Kubernetes through the GUI or API. These settings may be overwritten when backup configuration is updated. If you prefer a custom setup, keep the backup feature disabled and install your own Velero operator on the cluster with your preferred settings.
What To Do Next
For an introduction to object storage, see /s3/How-to-use-Object-Storage.