Create a Managed Kubernetes Cluster with Terraform on cloud environment
You can provision and manage Managed Kubernetes clusters declaratively using Terraform with .tf configuration files. This approach enables consistent, repeatable cluster deployments aligned with Infrastructure as Code.
What we are going to cover
Prerequisites
1. Hosting account
You need:
access to the Managed Kubernetes dashboard at https://mks.cloud.eumetsat.int/
2. Parameters for creating a new Managed Kubernetes cluster
You should know which cluster name, Kubernetes version, control plane flavor, and control plane size you want to use.
The same parameters are described in the GUI-based cluster creation article: How to create a Kubernetes cluster using the Managed Kubernetes launcher GUI.
3. Regional endpoints
Select the appropriate regional Terraform endpoint from Programmatic Endpoints for Managed Kubernetes.
Use the endpoint for the same region where you want to create the cluster.
Available Managed Kubernetes regions for cloud environment:
R1 –
mks.r1.cloud.eumetsat.int:443R2 –
mks.r2.cloud.eumetsat.int:443FRA1-3 –
mks.ela.cloud.eumetsat.int:443
4. Managed Kubernetes API token
Terraform needs a Managed Kubernetes API token.
Generate it as described in Obtain Managed Kubernetes API token and store it securely.
The token must be valid for the same region as the Terraform endpoint and must include permissions for the operations you want Terraform to perform.
Note
For cluster creation, the API token must include at least the roles needed to list regions, list versions, list machine specs, and create clusters.
If you also create worker nodes with Terraform, include the node pool roles required for creating, listing, updating, and deleting node pools.
5. Terraform installed
Install Terraform from the official documentation: Terraform.
Terraform also requires the CloudFerro provider, available from the Terraform Registry:
https://registry.terraform.io/providers/CloudFerro/cloudferro/latest
Here is what it looks like:
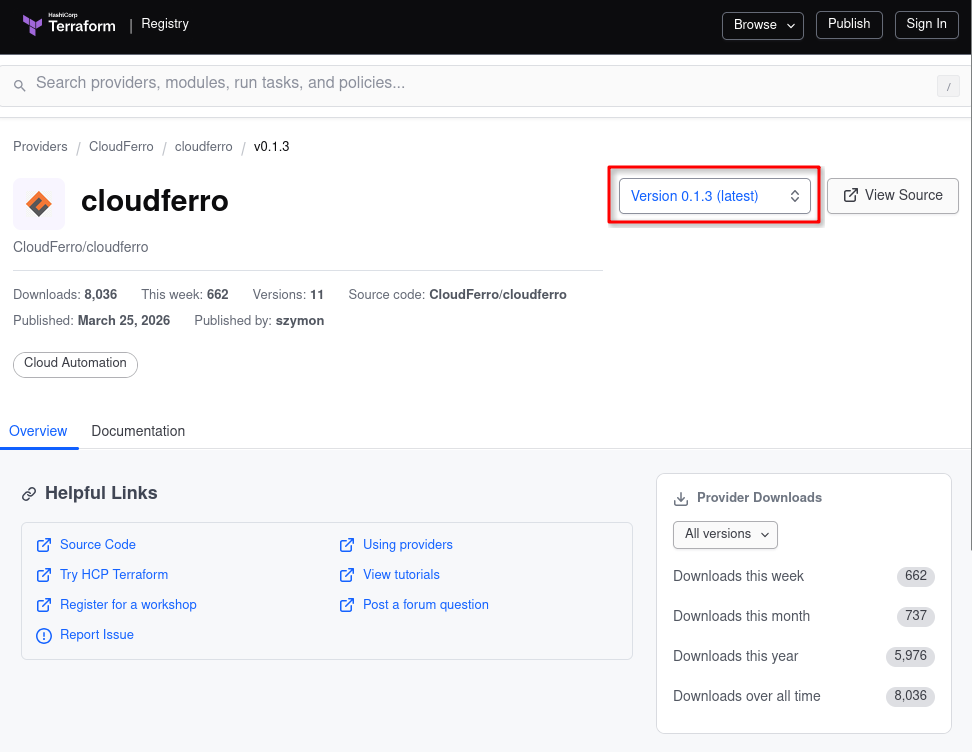
CloudFerro provider for Terraform.
In the red rectangle, you can see the latest provider version. Use that version in your Terraform code unless the documentation for your environment specifies another one.
Because the provider is available from the official Terraform Registry, the Terraform configuration only needs the provider source and version:
terraform {
  required_providers {
    cloudferro = {
      source = "cloudferro/cloudferro"
      # At the time of writing, the following version was used successfully:
      version = "0.1.3"
    }
  }
}
Note
If you change the provider version in an existing Terraform directory, run:
terraform init -upgrade
This updates .terraform.lock.hcl to match the provider version configured in your .tf files.
Create a cluster using a single Terraform file
Create a working directory:
mkdir mk8s-tf
cd mk8s-tf
Create a single file named sample.tf.
Use the tab that matches the region where you want to create the cluster:
terraform {
  required_providers {
    cloudferro = {
      source = "cloudferro/cloudferro"
      # At the time of writing, the following version was used successfully:
      version = "0.1.3"
    }
  }
}

variable "api_token" {
  description = "R1 Managed Kubernetes API token"
  type = string
  sensitive = true
}

provider "cloudferro" {
  host = "mks.r1.cloud.eumetsat.int:443"
  token = var.api_token
}

resource "cloudferro_kubernetes_cluster_v1" "cluster" {
  name = "tf-created-r1"
  version = "1.32.6"

  control_plane = {
    # Replace with a control plane flavor available in the selected region.
    # Example for R1: "16cpu-128gbmem"
    flavor = "CONTROL_PLANE_FLAVOR_AVAILABLE_IN_SELECTED_REGION"
    size = 1
  }
}
terraform {
  required_providers {
    cloudferro = {
      source = "cloudferro/cloudferro"
      # At the time of writing, the following version was used successfully:
      version = "0.1.3"
    }
  }
}

variable "api_token" {
  description = "R2 Managed Kubernetes API token"
  type = string
  sensitive = true
}

provider "cloudferro" {
  host = "mks.r2.cloud.eumetsat.int:443"
  token = var.api_token
}

resource "cloudferro_kubernetes_cluster_v1" "cluster" {
  name = "tf-created-r2"
  version = "1.32.6"

  control_plane = {
    # Replace with a control plane flavor available in the selected region.
    # Example for R1: "16cpu-128gbmem"
    flavor = "CONTROL_PLANE_FLAVOR_AVAILABLE_IN_SELECTED_REGION"
    size = 1
  }
}
terraform {
  required_providers {
    cloudferro = {
      source = "cloudferro/cloudferro"
      # At the time of writing, the following version was used successfully:
      version = "0.1.3"
    }
  }
}

variable "api_token" {
  description = "FRA1-3 Managed Kubernetes API token"
  type = string
  sensitive = true
}

provider "cloudferro" {
  host = "mks.ela.cloud.eumetsat.int:443"
  token = var.api_token
}

resource "cloudferro_kubernetes_cluster_v1" "cluster" {
  name = "tf-created-fra1-3"
  version = "1.32.6"

  control_plane = {
    # Replace with a control plane flavor available in the selected region.
    # Example for R1: "16cpu-128gbmem"
    flavor = "CONTROL_PLANE_FLAVOR_AVAILABLE_IN_SELECTED_REGION"
    size = 1
  }
}
Store the token as an environment variable
Set the API token as an environment variable:
export TF_VAR_api_token="paste-your-managed-kubernetes-token-here"
Terraform automatically uses this value for the variable:
token = var.api_token
To verify that the variable is set in your current shell, run:
echo "Token length: ${#TF_VAR_api_token}"
The result should be greater than 0.
Warning
Use normal straight quotes when exporting the token. Do not paste typographic quotes such as “ or ” into the shell.
If the shell changes to the continuation prompt >, press Ctrl+C and re-enter the command with straight quotes.
Define the control plane flavor
The control plane flavor is defined in this part of sample.tf:
control_plane = {
  flavor = "CONTROL_PLANE_FLAVOR_AVAILABLE_IN_SELECTED_REGION"
  size = 1
}
Replace CONTROL_PLANE_FLAVOR_AVAILABLE_IN_SELECTED_REGION with one of the control plane flavors available in the selected region.
Open the Managed Kubernetes dashboard, select the same region as the Terraform endpoint, start the cluster creation flow, and check the available values in the Control plane section.
Note
The flavor name is region-specific. For example, one region may use a CloudFerro-style flavor such as eo2a.large, while R1 may use a name such as 16cpu-128gbmem.
If Terraform returns control plane flavor not found, the selected flavor is not available in the region used by the Terraform endpoint.
Initialize and create the cluster
Initialize the Terraform working directory:
terraform init
If you changed the provider version after a previous initialization, use:
terraform init -upgrade
Create the cluster:
terraform apply
When prompted, type yes and press Enter.
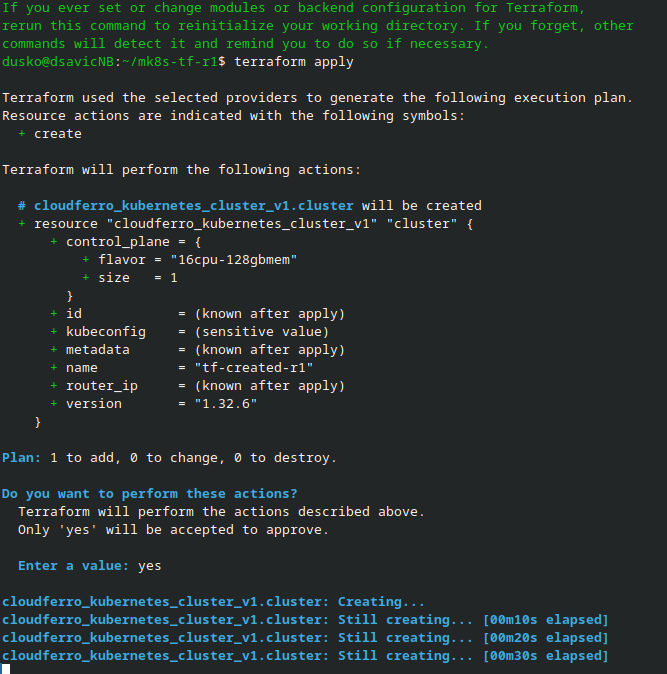
You can also see the cluster in the browser while its status is Creating:
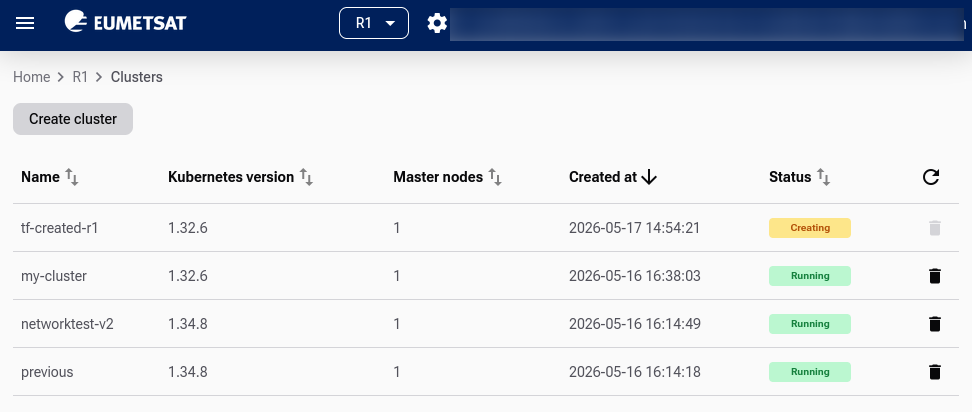
Creation of cluster started via Terraform but also visible in the GUI
Warning
Cluster creation may take dozens of minutes. Do not interrupt terraform apply while the cluster is being created.
If the command is interrupted after the API has already created the cluster, Terraform may mark the resource as tainted. On the next run, Terraform may try to destroy and recreate it.
If this happens, first check the cluster status in the Managed Kubernetes dashboard. If the cluster is healthy, recover the Terraform state with:
terraform untaint cloudferro_kubernetes_cluster_v1.cluster
terraform refresh
terraform plan
The expected result is:
No changes. Your infrastructure matches the configuration.
Note
If the cluster cannot be deleted from the GUI and terraform destroy returns cluster is busy, contact Support or the cloud operator. Provide the cluster name, cluster ID, region, router IP, and OpenStack project ID.
After the operator removes the stuck cluster, remove it from local Terraform state before retrying:
terraform state rm cloudferro_kubernetes_cluster_v1.cluster
Verify in the Managed Kubernetes dashboard
Open the Managed Kubernetes dashboard.
Select the region in which you created the cluster.
Confirm that the Terraform-created cluster appears and reaches the Running state.

Export kubeconfig
If you want Terraform to print the generated kubeconfig, add the following output block to sample.tf:
output "kubeconfig" {
  value = cloudferro_kubernetes_cluster_v1.cluster.kubeconfig
  sensitive = true
}
Apply the configuration again:
terraform apply
Then write the kubeconfig to a file:
terraform output -raw kubeconfig > tf-created_config.yaml
chmod 600 tf-created_config.yaml
export KUBECONFIG="$PWD/tf-created_config.yaml"
Verify access:
kubectl get nodes -o wide
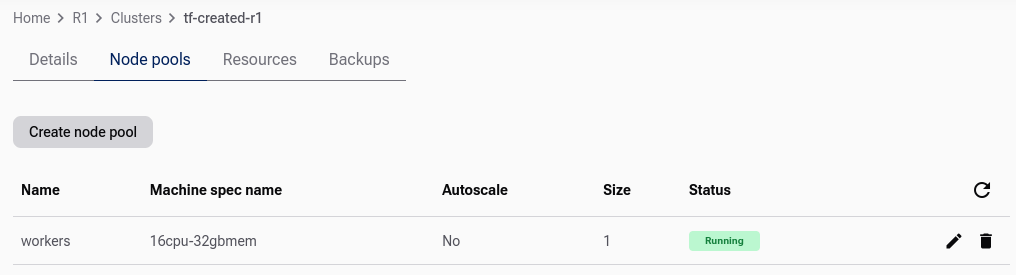
Add worker nodes
You can add worker nodes by creating another .tf file in the same directory.
Save the following file as add_workers.tf:
resource "cloudferro_kubernetes_node_pool_v1" "workers" {
  name = "workers"
  cluster_id = cloudferro_kubernetes_cluster_v1.cluster.id

  flavor = "WORKER_NODE_FLAVOR_AVAILABLE_IN_SELECTED_REGION"
  shared_networks = []

  labels = []
  taints = []

  autoscale = false
  size = 3
}
Replace WORKER_NODE_FLAVOR_AVAILABLE_IN_SELECTED_REGION with a worker node flavor available in the same region as the cluster.
Terraform executes all .tf files in the working directory as one configuration. In this case, it uses the cluster resource defined in sample.tf and creates the node pool defined in add_workers.tf.
Run:
terraform apply
When prompted, type yes and press Enter.
The process of adding worker nodes starts:
Destroy the cluster
To remove the test cluster and node pool, run:
terraform destroy
When prompted, type yes and press Enter.
Warning
This command removes resources managed by the Terraform configuration in the current directory. Make sure you run it from the correct directory and against the correct Managed Kubernetes region.
What to do next
After creating the cluster, you can:
export kubeconfig and connect with kubectl,
add more node pools,
store sample.tf and add_workers.tf in Git for repeatable cluster creation.
You can also create Kubernetes clusters using the GUI. See:
How to create a Kubernetes cluster using the Managed Kubernetes launcher GUI
Add node pools to Managed Kubernetes cluster using the launcher GUI
If you already have a cluster, you can back it up with Managed Kubernetes Backups on cloud environment.