Create and use volume snapshots on cloud environment Managed Kubernetes
Kubernetes can create a point-in-time snapshot of a persistent volume and later use that snapshot to restore data into a new PersistentVolumeClaim. Typical examples include:
preparing a rollback point before application changes,
testing backup and restore procedures,
creating a recoverable copy of application data,
restoring a previous storage state into a new volume.
Unlike cloning, which creates a new volume directly from another PVC, a snapshot creates an intermediate recovery point that can be reused later.
What We Are Going To Cover
In this article, you will:
create a source PersistentVolumeClaim,
mount it in a pod and write test data,
create a VolumeSnapshot from the source claim,
verify that the snapshot is ready,
create a new PersistentVolumeClaim from the snapshot,
mount the restored volume in a second pod,
verify that the restored volume contains the original data.
Prerequisites
1. Hosting account
You need:
access to the Managed Kubernetes dashboard at https://mks.cloud.eumetsat.int/
A running Managed Kubernetes cluster
You need an existing cloud environment Managed Kubernetes cluster and a working kubectl configuration for that cluster. See How to create a Kubernetes cluster using the Managed Kubernetes launcher GUI.
Supported Managed Kubernetes region
Volume snapshot availability and storage classes depend on the region and cloud where the cluster is running. Use a cluster in a supported Managed Kubernetes region, and always check the available storage classes and snapshot classes before creating the test resources.
Available Managed Kubernetes regions for cloud environment:
R1
R2
FRA1-3
At least one schedulable worker node
At least one worker node should be in the Ready state before you continue. To check the available nodes, run:
kubectl get nodes -o wide
Here is what it might look like:

A pod used to verify volume snapshots cannot run if the cluster contains only a control-plane node that is marked to reject normal workload pods.
Basic knowledge of Kubernetes storage
It is helpful to understand the difference between:
PersistentVolume (PV), which represents storage available to the cluster,
PersistentVolumeClaim (PVC), which is a request for storage made by a workload,
VolumeSnapshot, which captures a point-in-time state of a volume.
Available Cinder-backed storage classes
To see which storage classes are available in your current cluster and region, run:
kubectl get sc
The result may look like this:

Look for storage classes whose provisioner is cinder.csi.openstack.org. These are Cinder-backed storage classes and are suitable for the ReadWriteOnce PVCs used in this article.
The exact storage class names may differ between clouds and regions. Always use the output of kubectl get sc as the source of truth.
In the examples below, replace <cinder-storage-class-name> with a valid Cinder-backed storage class from your cluster.
Available VolumeSnapshotClass
Check which snapshot classes are available in your cluster:
kubectl get volumesnapshotclass
This article uses cinder-csi-delete. If your cluster uses a different Cinder-backed snapshot class, replace cinder-csi-delete in the examples with a class available in your cluster.
Create the source PersistentVolumeClaim
Save the following file as snapshot-source-pvc.yaml:
apiVersion: v1
kind: PersistentVolumeClaim
metadata:
  name: snapshot-source-pvc
spec:
  storageClassName: <cinder-storage-class-name>
  accessModes:
    - ReadWriteOnce
  resources:
    requests:
      storage: 5Gi
Replace <cinder-storage-class-name> with a Cinder-backed storage class available in your cluster.
For example, if kubectl get sc shows a Cinder-backed storage class named general-performance, use:
storageClassName: general-performance
Apply the manifest:
kubectl apply -f snapshot-source-pvc.yaml
Wait until the source PVC is Bound:
kubectl wait --for=jsonpath='{.status.phase}'=Bound pvc/snapshot-source-pvc --timeout=180s
kubectl get pvc snapshot-source-pvc
Do not continue until the PVC is Bound. If you create the snapshot before the PVC is bound to a PersistentVolume, the snapshot controller will not be able to create the snapshot.
Write data to the source volume
Save the following file as snapshot-writer-pod.yaml:
apiVersion: v1
kind: Pod
metadata:
  name: snapshot-writer
spec:
  containers:
  - name: app
    image: busybox
    command: ["sh", "-c", "echo hello-from-snapshot-source > /data/file.txt; sleep 3600"]
    volumeMounts:
    - mountPath: /data
      name: data
  volumes:
  - name: data
    persistentVolumeClaim:
      claimName: snapshot-source-pvc
Apply the manifest and wait for the pod to become ready:
kubectl apply -f snapshot-writer-pod.yaml
kubectl wait --for=condition=Ready pod/snapshot-writer --timeout=120s
To verify that the file was written successfully, run:
kubectl exec snapshot-writer -- cat /data/file.txt
You should see:
hello-from-snapshot-source
Delete the writer pod
Before creating the snapshot, delete the writer pod so that the source volume is no longer mounted by the pod.
Run:
kubectl delete pod snapshot-writer
The result is:
pod "snapshot-writer" deleted
This step is necessary because the cloud storage backend, OpenStack Cinder, requires the source volume to be in the correct state before a snapshot can be created.
Before continuing, verify again that the source PVC is still Bound:
kubectl get pvc snapshot-source-pvc
Create a VolumeSnapshot
Save the following file as volume-snapshot.yaml:
apiVersion: snapshot.storage.k8s.io/v1
kind: VolumeSnapshot
metadata:
  name: snapshot-copy
spec:
  volumeSnapshotClassName: cinder-csi-delete
  source:
    persistentVolumeClaimName: snapshot-source-pvc
The value cinder-csi-delete means that when this VolumeSnapshot object is deleted, the corresponding backend snapshot is also removed.
If your cluster uses another Cinder-backed snapshot class, replace cinder-csi-delete with the correct value from kubectl get volumesnapshotclass.
Apply the manifest:
kubectl apply -f volume-snapshot.yaml
Verify that the snapshot is ready
To verify that the snapshot was created successfully, run:
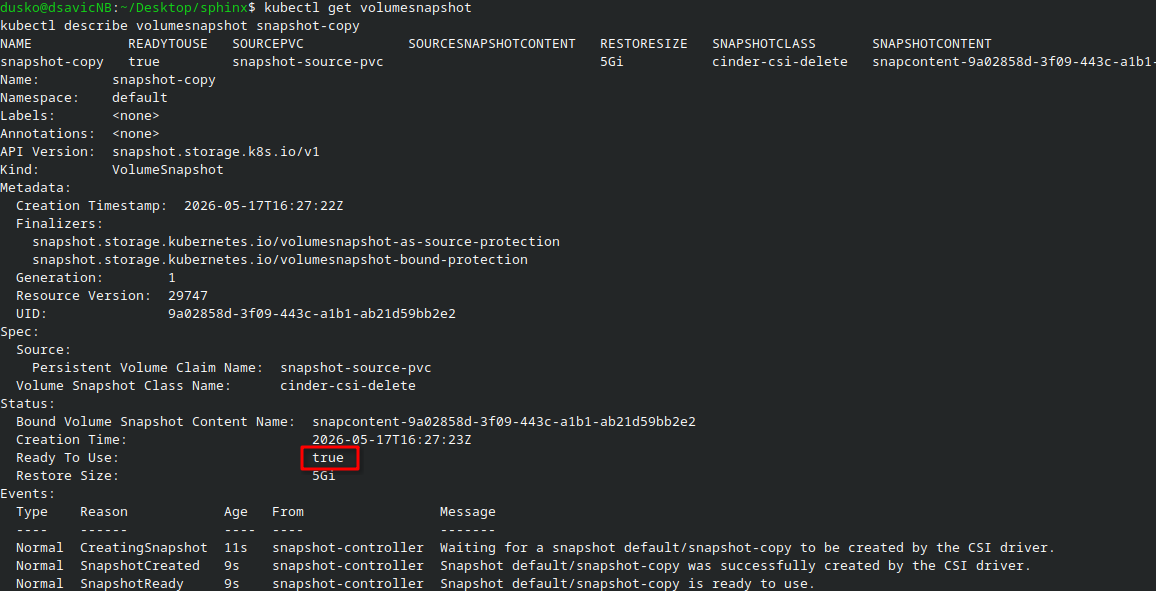
kubectl get volumesnapshot
kubectl describe volumesnapshot snapshot-copy
The snapshot should eventually show READYTOUSE as true in the output.
You can watch the status with:
watch -n 3 kubectl get volumesnapshot snapshot-copy
When READYTOUSE becomes true, press Ctrl+C to stop watching.
Create a new PVC from the snapshot
Save the following file as snapshot-restored-pvc.yaml:
apiVersion: v1
kind: PersistentVolumeClaim
metadata:
  name: snapshot-restored-pvc
spec:
  storageClassName: <cinder-storage-class-name>
  accessModes:
    - ReadWriteOnce
  dataSource:
    name: snapshot-copy
    kind: VolumeSnapshot
    apiGroup: snapshot.storage.k8s.io
  resources:
    requests:
      storage: 5Gi
Use the same valid Cinder-backed storage class as in snapshot-source-pvc.yaml.
For example, if kubectl get sc shows a Cinder-backed storage class named general-performance, use:
storageClassName: general-performance
Apply the manifest:
kubectl apply -f snapshot-restored-pvc.yaml
Wait until the restored PVC is Bound:
kubectl wait --for=jsonpath='{.status.phase}'=Bound pvc/snapshot-restored-pvc --timeout=180s
kubectl get pvc
The restored claim should show status Bound, which means the new volume has been created successfully from the snapshot.

Mount the restored volume in a second pod
Save the following file as snapshot-reader-pod.yaml:
apiVersion: v1
kind: Pod
metadata:
  name: snapshot-reader
spec:
  containers:
  - name: app
    image: busybox
    command: ["sh", "-c", "cat /data/file.txt; sleep 3600"]
    volumeMounts:
    - mountPath: /data
      name: data
  volumes:
  - name: data
    persistentVolumeClaim:
      claimName: snapshot-restored-pvc
Apply the manifest:
kubectl apply -f snapshot-reader-pod.yaml
kubectl wait --for=condition=Ready pod/snapshot-reader --timeout=120s
Verify the restored data
Check the pod log:
kubectl logs snapshot-reader
If the pod starts successfully, you should see:
hello-from-snapshot-source

This confirms that the snapshot captured the original data and that the restored PVC contains that data.
A volume snapshot captures a point-in-time state
Volume snapshots preserve storage state at a specific point in time, but they are not the same as shared access or live synchronization.
This means:
a snapshot captures the volume state only at the moment it is created,
later changes to the source volume do not automatically update the snapshot,
restoring from a snapshot creates a separate volume.
What to do next
You have now created a volume snapshot and restored a new PersistentVolumeClaim from it.
As a next step, you can compare this approach with:
/kubernetes/Volume-cloning-Managed-Kubernetes
Cinder-backed ReadWriteOnce storage for standard persistence.
Clean up the resources created in this article
If you no longer need the test resources created in this article, delete the restored pod, the snapshot, and both PersistentVolumeClaims.
Run:
kubectl delete pod snapshot-reader snapshot-writer --ignore-not-found
kubectl delete volumesnapshot snapshot-copy --ignore-not-found
kubectl delete pvc snapshot-restored-pvc snapshot-source-pvc --ignore-not-found
In the normal workflow, the writer pod was already deleted earlier in the procedure before the snapshot was created. The command above includes it as well so that the cleanup works even if you recreated it manually during testing.
The PersistentVolumes used in this workflow were created dynamically from the PersistentVolumeClaims. Because the associated storage class uses the Delete reclaim policy, deleting the PVCs also triggers removal of the dynamically provisioned volumes created for this test.
To verify the cleanup status, run:
kubectl get pod
kubectl get volumesnapshot
kubectl get pvc
kubectl get pv
The pods snapshot-reader and snapshot-writer, the snapshot snapshot-copy, and the claims snapshot-source-pvc and snapshot-restored-pvc should disappear immediately.
The corresponding dynamically created PersistentVolumes may remain temporarily in the Released state while backend cleanup is still in progress. After the cleanup finishes, they should also disappear from the output.