Use backup command to create rotating backups of virtual machines on cloud environment cloud
Rotating backups in OpenStack are a backup strategy where older backups are automatically deleted after a predefined number of backups has been created. This prevents storage from growing indefinitely while still keeping a selected number of recent backups available for disaster recovery.
The rotating backup algorithm
Creating rotating backups of virtual machines includes the following steps:
- Define the backup period
Usually daily, weekly, monthly, or another period that matches your recovery policy.
- Define the rotation limit
The number of backups to retain. This article refers to this number as maxN.
- Delete older backups
Once the limit is reached, older backups are deleted automatically, usually starting from the oldest one.
Backup create vs. image create
There are two common ways to create backups under OpenStack:
openstack server backup create
openstack server image create
They behave differently.
Feature |
openstack server backup create |
openstack server image create |
|---|---|---|
Association with VM |
Associated using the backup image property. |
Associated using the backup name. |
Rotation support |
Rotation with –backup-type and –rotate. |
No built-in rotation support. |
Classification in Horizon |
Marked as image. |
Marked as snapshot. |
Horizon Select Boot Source |
Choose Instance Snapshot. |
Choose Image. |
Purpose |
Primarily used for backups that can be rotated and managed. |
Creates a single VM snapshot without built-in rotation. |
Incremental backup support |
Yes. |
No, creates a full snapshot. |
Multiple rotating schedules |
No, only one rotating series. |
Yes, for example daily, weekly, and monthly. |
Best usage scenario |
Simple automated backup strategy with one rotation series. |
Capturing VM state for cloning, rollback, or custom scripted rotation. |
Can be scripted? |
Yes. |
Yes. |
In this article, you will use the openstack server backup create command to create rotating backups of virtual machines.
Prerequisites
No. 1 Account
You need a cloud environment hosting account with access to the Horizon interface: https://my.cloud.eumetsat.int.
No. 2 VM which will be backed up
You need a virtual machine to back up. If you do not have one yet, you can create it by following one of these articles:
How to create a Linux VM and access it from Windows desktop on cloud environment
How to create a Linux VM and access it from Linux command line on cloud environment
To learn how to create a Windows virtual machine, see this article:
How to create Windows VM on OpenStack Horizon and access it via web console on cloud environment
In this article, the virtual machine that will be backed up is called vm-to-backup. Replace this name with the name of your own virtual machine where needed.
No. 3 Server on which the backup process will run
You need a server from which the backup commands will be executed. This server may be in the same region as the backed-up instance, in another region, or outside cloud environment cloud.
In this article, this server is called backing-server. It is assumed to be an Ubuntu 24.04 LTS machine with SSH access.
No. 4 OpenStackClient installed on backing-server
You need OpenStackClient installed on backing-server.
How to install OpenStackClient for Linux on cloud environment
After you sign in to backing-server through SSH, you will use the openstack command to manage backups of vm-to-backup.
No. 5 Application credentials
You may be using two-factor authentication to sign in to cloud environment as a user. In this article, backup creation is automated, so authentication should also be automated.
For this purpose, use application credentials stored in a clouds.yml file.
Use How to generate or use Application Credentials via CLI on cloud environment to learn how to create application credentials and store them in clouds.yml.
Copy clouds.yml to backing-server.
The clouds.yml file may store multiple credential profiles. To choose the profile used by OpenStackClient, use the –os-cloud parameter. In this article, the placeholder profile name is backup_test.
The region is selected with the –os-region parameter.
For the examples in this article, define the following shell variable:
OS_CLOUD_NAME="backup_test"
Use the tab for the region where your virtual machine exists:
OS_REGION_NAME="R1"
OS_REGION_NAME="R2"
OS_REGION_NAME="FRA1-3"
Important
These shell variables are valid only in the current terminal session. If you open a new terminal, define them again.
To test the credentials and region, list virtual machines in your project:
openstack server list \
  --os-cloud "$OS_CLOUD_NAME" \
  --os-region "$OS_REGION_NAME"
No. 6 Knowledge of cron under Linux
cron is a standard Linux tool for executing tasks according to a predefined schedule. In this article, it is used only for basic automation.
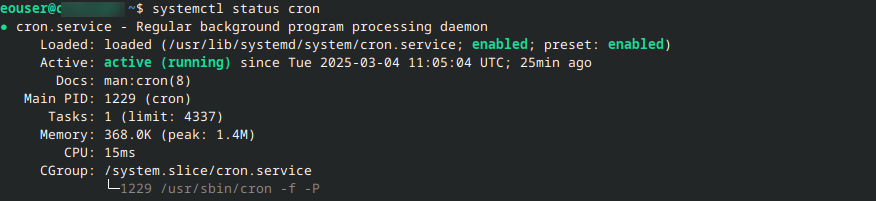
If cron is installed, the following command:
systemctl status cron
should produce output similar to this:
If cron is not installed, install and enable it:
sudo apt update
sudo apt install cron -y
sudo systemctl enable --now cron
systemctl status cron
The basic command to enter or modify cron jobs is:
crontab -e
By default, the crontab file may open in the preinstalled editor. If you want to use nano, install it first:
sudo apt install nano
To open crontab with nano, use:
EDITOR=nano crontab -e
No. 7 Knowledge of openstack server backup create
The openstack server backup create command creates a backup image of a server.
See How to Back Up an Instance and Download it to the Desktop on cloud environment OpenStack Hosting for the basic syntax of the CLI command used to create a server backup.
Create the first backup
The following command manually creates a rotating backup:
openstack server backup create \
  --name my-backup1 \
  --rotate 3 \
  --os-cloud "$OS_CLOUD_NAME" \
  --os-region "$OS_REGION_NAME" \
  vm-to-backup
In this command:
my-backup1 is the name of the backup,
3 is the rotation limit,
vm-to-backup is the VM to back up,
–os-cloud selects the application credentials profile,
–os-region selects the region.
How to see the created backups
Backups created by this command are images. In Horizon, they can be seen under Compute -> Images.
To list images with CLI, run:
openstack image list \
  --os-cloud "$OS_CLOUD_NAME" \
  --os-region "$OS_REGION_NAME"
By default, this command displays all images found in your project.
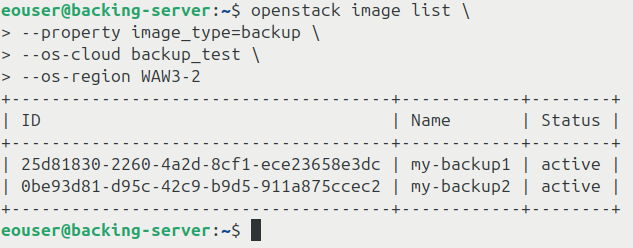
To show only backups created with openstack server backup create, filter by the image_type=backup property:
openstack image list \
  --property image_type=backup \
  --os-cloud "$OS_CLOUD_NAME" \
  --os-region "$OS_REGION_NAME"
Add another backup to the series
The first backup in the rotating series has been created. To add another backup to the same series, run the same command and change the backup name.
For example, if the first backup was named my-backup1, create the second backup as my-backup2:
openstack server backup create \
  --name my-backup2 \
  --rotate 3 \
  --os-cloud "$OS_CLOUD_NAME" \
  --os-region "$OS_REGION_NAME" \
  vm-to-backup
Keep the value of –rotate the same for the same backup series. Changing this value during later runs may lead to confusing or unexpected results.
You will now have two backups of the same VM, named my-backup1 and my-backup2.
Run the command again with the name my-backup3. The rotation limit has now been reached.
If you then run the command again with the name my-backup4, one of the older backups should be removed automatically.
List backup images again:
openstack image list \
  --property image_type=backup \
  --os-cloud "$OS_CLOUD_NAME" \
  --os-region "$OS_REGION_NAME"
There should be only three backup images left.
Problems and shortcomings of the backup command
The openstack server backup create command is useful, but it has several limitations:
The procedure is manual unless you automate it with a scheduler such as cron.
The command cannot differentiate between separate daily, weekly, and monthly backup series. The –rotate value should remain the same every time you run the command for the same backup series.
If you use the same backup name twice, the backup may still be created, but OpenStackClient may return a message similar to:
More than one Image exists with the name 'my-backup1'.
During restore operations, use the backup image ID instead of the backup name when there is any ambiguity.
Automating through cron jobs
Linux cron can automate creation of rotating backups. For basic cron usage, see Prerequisite No. 6.
Open the crontab file:
crontab -e
Add a cron job that creates a backup of your virtual machine. For example:
4 3 * * * openstack server backup create --name "backup_cron_$(date +\%Y-\%m-\%d_\%H-\%M)" --rotate 3 --os-cloud backup_test --os-region FRA1-3 vm-to-backup >> $HOME/log_backup 2>> $HOME/log_backup
Replace backup_test, FRA1-3, and vm-to-backup with values from your own environment.
Note
Cron does not automatically know the shell variables you defined earlier in your interactive terminal session. For that reason, the cron example uses explicit values instead of $OS_CLOUD_NAME and $OS_REGION_NAME.
This is what the command may look like in the nano editor:
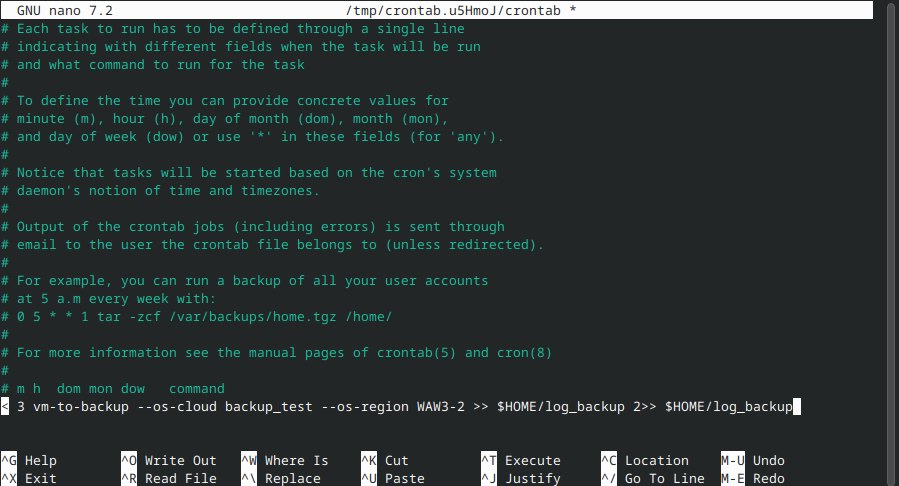
The line is long, so it is often easier to prepare it locally first and then paste it into the crontab file.
In this example, the job uses the following parameters:
- Run time
Runs every day at 3:04 AM in the timezone configured on the server. Default cloud images often use UTC.
- Backup created
Creates a backup of virtual machine vm-to-backup. The backup name starts with backup_cron_ and then includes the current date and time in the following format: Year-Month-Day_Hour-Minute.
- Number of backups kept
maxN is 3.
- Cloud profile
Authenticates with profile backup_test from clouds.yml.
- Region
Uses the region specified after –os-region.
- Logs
Appends standard output and standard error to file log_backup in the user’s home directory.
Restoring backups
This section describes how to restore a virtual machine to a previous state from backup.
Rebuild an instance
Rebuilding an instance replaces the current contents of the virtual machine disk with the contents of an image. In this process, metadata such as VM name or ID is kept. This also includes floating IP assignments.
During this process, the virtual machine is unavailable.
Warning
This operation removes data from the virtual machine on which it is performed. Make sure that the virtual machine does not contain any data that you need to keep.
List backup images:
openstack image list \
  --private \
  --os-cloud "$OS_CLOUD_NAME" \
  --os-region "$OS_REGION_NAME"
Example output:
+--------------------------------------+------------+--------+
| ID                                   | Name       | Status |
+--------------------------------------+------------+--------+
| 3efb29d5-40bb-44aa-ad4e-3b66bc4fd5a3 | my-backup1 | active |
| 37f1510b-ff4f-4dc0-9fea-e310cf987de6 | my-backup2 | active |
+--------------------------------------+------------+--------+
The command to restore from a backup is:
openstack server rebuild \
  --image my-backup2 \
  --os-cloud "$OS_CLOUD_NAME" \
  --os-region "$OS_REGION_NAME" \
  vm-to-backup
In this command:
my-backup2 is the ID or name of your backup image,
vm-to-backup is the ID or name of your instance.
You should get output similar to this:
+-------------------+----------------------------------------------------------+
| Field             | Value                                                    |
+-------------------+----------------------------------------------------------+
| OS-DCF:diskConfig | MANUAL                                                   |
| accessIPv4        |                                                          |
| accessIPv6        |                                                          |
| addresses         | private-network=10.0.0.56                                |
| adminPass         | zrWv6nfof7Mn                                             |
| created           | 2025-02-13T09:40:23Z                                     |
| flavor            | eo1.xsmall (eo1.xsmall)                                  |
| id                | 3a42cda7-ab72-4c6a-a6f3-11000e6e54ac                     |
| image             | my-backup2 (37f1510b-ff4f-4dc0-9fea-e310cf987de6)        |
| name              | vm-to-backup                                             |
| progress          | 0                                                        |
| status            | REBUILD                                                  |
+-------------------+----------------------------------------------------------+
Wait until the restore operation finishes.
To check the VM status, run:
openstack server show \
  -c status \
  --os-cloud "$OS_CLOUD_NAME" \
  --os-region "$OS_REGION_NAME" \
  vm-to-backup
If the status is ACTIVE, the VM should be ready.
What to do next
In this article, you used openstack server backup create. If you need multiple rotating schedules, openstack server image create with a custom script may be a better choice.