How to upload your custom image using OpenStack CLI on cloud environment
In this tutorial, you will upload a custom image stored on your local computer to cloud environment cloud by using the OpenStack CLI client. The uploaded image will be available within your project alongside the default images from cloud environment cloud, and you will be able to create virtual machines from it.
What We Are Going To Cover
How to check whether the image is already available in your OpenStack cloud.
How different images might behave.
How to upload the image by using only CLI commands.
Example: how to upload a Debian 11 image.
What happens if you lose Internet connection during upload.
Prerequisites
No. 1 Account
You need a cloud environment hosting account with access to the Horizon interface: https://horizon.cloudferro.com/auth/login/?next=/.
No. 2 OpenStack CLI configured
You need to have the OpenStack CLI client configured and operational. See How to install OpenStackClient for Linux on cloud environment. You can test whether your OpenStack CLI is properly activated by executing the openstack server list command mentioned at the end of that article. It should return the list of your virtual machines.
No. 3 Custom image you wish to upload
You need to have the image you wish to upload.
The following image formats are supported:
Format |
Format |
Format |
Format |
Format |
|---|---|---|---|---|
aki |
ami |
ari |
iso |
qcow2 |
raw |
vdi |
vhd |
vhdx |
vmdk |
The following container formats are supported:
Format |
Format |
Format |
Format |
|---|---|---|---|
aki |
ami |
ari |
bare |
docker |
ova |
ovf |
For the explanation of these formats, see article What Image Formats are Available in OpenStack cloud environment cloud.
No. 4 Uploaded public SSH key
If the image you wish to upload requires you to attach an SSH public key while creating the virtual machine, the key must be uploaded to cloud environment cloud. One of these articles should help:
How to add SSH key from Horizon web console on cloud environment
How to import SSH public key to OpenStack Horizon on cloud environment
No. 5 Basic knowledge about the Linux command line
Basic knowledge about the Linux command-line interface is required.
Always use the latest value of image ID
From time to time, the default operating system images in cloud environment cloud are upgraded to new versions. As a consequence, their image ID changes. For example, the image ID for Ubuntu 20.04 LTS may have been 574fe1db-8099-4db4-a543-9e89526d20ae at the time this article was originally written. When working through the article, you should normally use the current value of the image ID instead.
If you automate OpenStack operations with Heat, Terraform, Ansible, or another automation tool, avoid hardcoding an old image ID. Once the default image is upgraded and its ID changes, automation that uses the old ID may stop working.
Warning
Make sure that your automation code uses the current value of an OS image ID, not a hardcoded historical value.
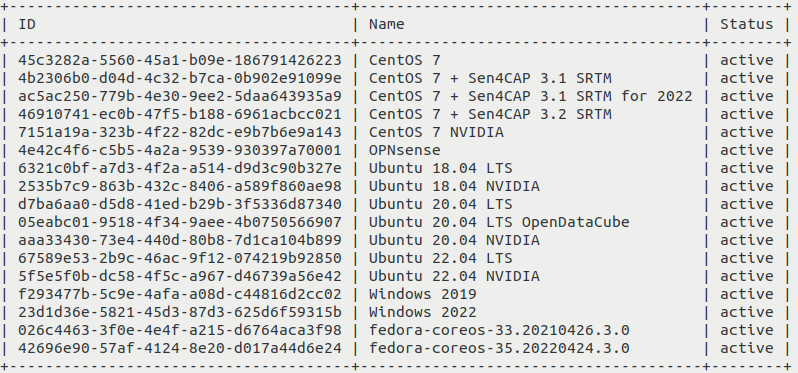
Step 1: Check for the presence of the image in your OpenStack cloud
Before uploading an image, check whether you need to upload it at all. It may already be available in cloud environment cloud. Assuming that you have met all prerequisites, including authenticating to the OpenStack CLI client, execute the following command:
openstack image list
You should see the list of images available to you, for example:
Step 2: Know the rules for the image before uploading it
Different images behave differently in cloud environment cloud, depending on how they are built.
- SSH access
If your image has SSH access enabled, you need to know which username to use when accessing virtual machines created from that image. Most images expect SSH access and allow you to:
supply your own key pair during VM creation,
use that key pair for access.
However, some images require a specific key pair and expect you to:
enter it during VM creation,
use only that key pair for access.
Other images may follow different access rules. Those cases are outside the scope of this article.
- Web console access
Your image may have a default account that can be used to log in through the web console. That account may or may not have a password.
- Privileges
User accounts in the image may or may not have sudo privileges.
Here are the typical rules for default images from cloud environment cloud:
- Account called eoconsole
You can log in to this account through the web console. First login does not require a password, but you need to set a new password before continuing to use this account. It has sudo privileges.
- Account called eouser
This account can be accessed through SSH. You can authenticate to it by using the SSH key you provided during virtual machine creation. It also has sudo privileges. You will use this account in almost all applications within cloud environment cloud.
This article How to access the VM from OpenStack console on cloud environment explains how to enter the web console as the eoconsole user and then continue as the eouser user. If the custom image you uploaded supports web console access, you can use the web console mentioned in that article for this purpose. However, the way you interact with the web console may differ depending on the image.
By contrast, the Debian image uploaded in this article uses the following access rules:
Web console access is not allowed, so you must use an SSH client from another machine.
You can access the account called debian by using the SSH key you provided while creating your virtual machine.
Step 3: Upload the image
Assuming that you still want to upload the image, navigate to the folder that contains the image you wish to upload, for example:
cd ~/my-images
Execute the following command. Replace the relevant parts as explained below.
openstack image create --disk-format qcow2 --container-format bare --private --file ./image.qcow2 --min-disk 6 --min-ram 2048 image_name --fit-width
The meaning of the parameters is as follows:
- –disk-format
Replace qcow2 with the image format. Supported values include aki, ami, ari, iso, ploop, qcow2, raw, vdi, vhd, vhdx, and vmdk. If you do not specify this parameter, raw is used.
- –container-format
Replace bare with the image container format. Supported values include ami, ari, aki, bare, docker, ova, and ovf. If you do not specify this parameter, bare is used.
- –file
Replace ./image.qcow2 with the name and location of the image file.
- –min-disk
Replace 6 with the selected storage requirement in gigabytes. For example, leave 6 if you want to use that image only on virtual disks that have at least 6 GB.
- –min-ram
Replace 2048 with the RAM requirement for your operating system in megabytes. This prevents creating VMs with insufficient RAM.
- Image name
The last parameter is the name under which the image will be known in OpenStack. It does not have to be the same as the name of the file you are uploading. Replace image_name in the command above.
Visibility rules
Image visibility defines which projects can access the new image. You can set it in one of the following ways:
private makes the image visible within your project. It can be set by passing the –private parameter to the command above.
shared makes the image visible within your project and shareable with other projects. It can be set by passing the –shared parameter to the command above.
These parameters do not take input values. You can choose only one of them at a time. If you do not add either parameter, the image visibility is set to private.
Images with visibility set to public can be seen by all users of the cloud. This privilege is reserved for the administrators of cloud environment cloud as a whole.
Administrators within their own organizations also cannot use –public. If a standard user tries to upload this type of image, the process results in an error.
- –fit-width
Optional parameter that improves output legibility in some circumstances. It attempts to fit the output width to the width of the display and can be used with many OpenStack commands.
After executing the command above, the upload process begins. No output should be displayed until it is finished.
If you lose Internet connection during the upload and reconnect, the process might resume. In that case, the image may still be successfully uploaded. If the upload is not successful, delete the failed upload and try again. See the section Troubleshooting - Internet connection lost at the end of this article.
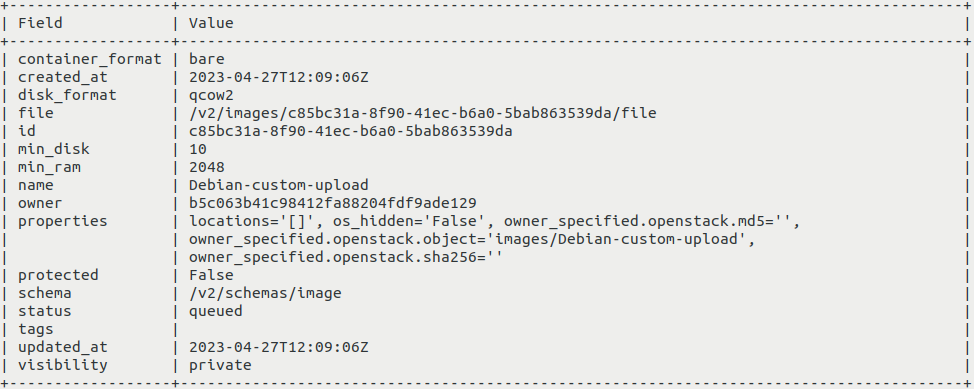
Once the process is over, the output should contain information about the uploaded image, including its ID in the id field. It will be similar to this:
The next steps are:
Copy the ID.
Replace c85bc31a-8f90-41ec-b6a0-5bab863539da with the ID you copied in the command below and execute it.
openstack image show c85bc31a-8f90-41ec-b6a0-5bab863539da --fit-width
Make sure that the status field contains active or saving. If it does not, the image was likely uploaded incorrectly. Delete that image and try again. For more information, see the section Troubleshooting - Internet connection lost at the end of this article.
If the status of your image is saving, execute the command above again until the status becomes active.
If your image remains in the Saving status for too long, something may have gone wrong. Contact cloud environment customer support: Help Desk and Support.
Example: How to upload an image for Debian 11
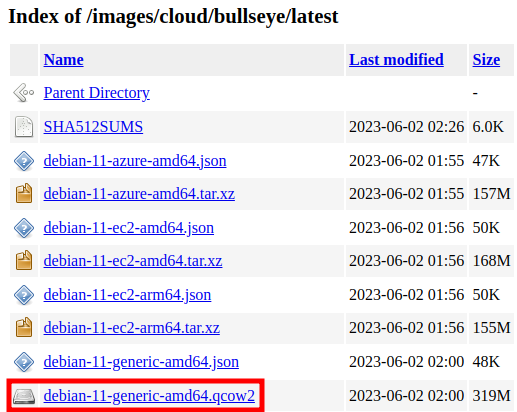
This example covers uploading the official QCOW2 image for Debian 11, which is not available in cloud environment cloud by default.
First, navigate to https://cloud.debian.org/images/cloud/bullseye/latest/ and download the image debian-11-generic-amd64.qcow2 to your computer:
Open the terminal in which you have access to the OpenStack CLI and use the source command with the appropriate RC file as the parameter, as you did in Prerequisite No. 2.
Navigate to the folder containing that image. Execute the following command:
openstack image create --disk-format qcow2 --container-format bare --private --file ./debian-11-generic-amd64.qcow2 --min-disk 10 --min-ram 2048 Debian-custom-upload --fit-width
It uploads the image under the name Debian-custom-upload with visibility set to private. The requirements for that image are set to 10 GB minimum storage and 2 GB RAM. You can provide different values if needed. If you want to set the visibility to shared, replace –private with –shared.
During the upload process, you should see no output. Once the process is complete, the output should change to this:
To make sure that the upload was successful, copy the ID of the image shown in the id field. In the command below, replace c85bc31a-8f90-41ec-b6a0-5bab863539da with the ID of the image you copied:
openstack image show c85bc31a-8f90-41ec-b6a0-5bab863539da --fit-width
Make sure that the status field contains active:

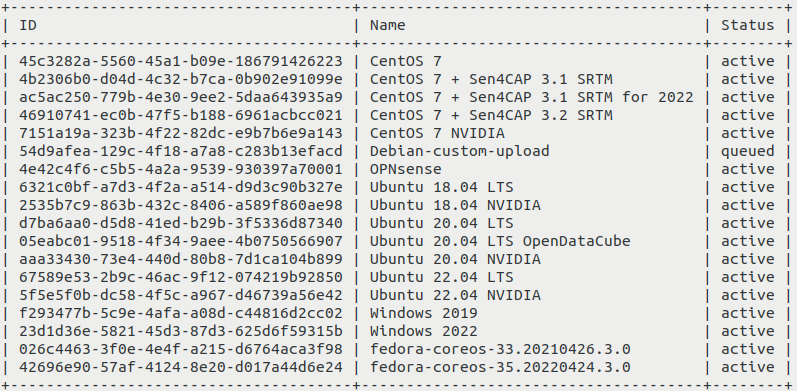
Execute the following command to see the images available to you again:
openstack image list
You should now see your image on the list.

Troubleshooting - Internet connection lost
If you lose Internet connection during image upload, the process may resume automatically if you reconnect in time. After the upload, you receive output similar to the following:
You can verify its status by executing the command below. Replace c85bc31a-8f90-41ec-b6a0-5bab863539da with the ID of your image.
openstack image show c85bc31a-8f90-41ec-b6a0-5bab863539da
If the status is active, you can create a virtual machine using that image.
Sometimes, however, the upload is not successful. The openstack image list command then shows that the image still has the status queued, which means that the upload is waiting in a queue:
You then need to delete that image and upload it again. First, copy the ID of the image from the command output. Then execute the command below. Replace 54d9afea-129c-4f18-a7a8-c283b13efacd with the ID you copied:
openstack image delete 54d9afea-129c-4f18-a7a8-c283b13efacd
After that, you can try uploading again.
What To Do Next
You can also upload images using the Horizon dashboard: How to upload custom image to cloud environment cloud using OpenStack Horizon dashboard.
After creating a virtual machine from your custom image, you may want to configure access to the EODATA repository, which contains Earth observation data. The following article explains how to do that if your image is based on Ubuntu, Debian, or CentOS: /eodata/How-to-mount-eodata-using-S3FS-in-Linux-on-Eumetsat-Elasticity.