How to create a Share using Horizon
Note
Shares functionality is present only in regions R1 and R2.
The Share service in OpenStack provides file-based storage that can be accessed from virtual machines over a network file-sharing protocol such as NFS. In this article, you will create a new share from the Horizon dashboard. After the share is created, it appears on the Shares page.
Creating the share is only the first part of the workflow. Before you can mount it from a virtual machine, you must also configure access to the share. A share is useful when several virtual machines need access to the same files or directories, for example shared datasets, application files, logs, processing output, or project workspaces.
Prerequisites
Before you create a share, make sure that the project, share, VM, and networking prerequisites are in place.
You need a cloud environment hosting account with access to the Horizon interface:
https://horizon.cloudferro.com/
Choose ECIS and FRA1-3 as the region.
You have selected the correct project in Horizon.
Shares and share access rules are managed inside the currently selected project. Check the project name in the top bar before you continue.
A suitable Share Network is available in the project.
The share network connects the Share service to the project networking environment. Without a suitable share network, the share may exist but not be reachable from the virtual machine that should mount it.
To check available share networks, use commands Project → Share → Share Networks.
The name of the preconfigured share network for the shared file storage service usually starts with sfs_share_network_, for example:
sfs_share_network_4f568e2bac54b439e9f578e63a04591
The exact name may be different in your project. What matters is that the share was created with a suitable sfs_share_network_ share network.
The share uses the NFS protocol.
This article follows the standard NFS workflow used in this article series. At the time of this writing, the only protocol that is implemented is NFS so it is mandatory to use it.
You know which virtual machine or network will later access the share.
For an NFS share, access is usually granted to an IP address or network. Use the address or network that represents the VM, subnet, or client environment from which the share will be mounted.
The virtual machine can reach the share network endpoint.
Creating an access rule does not fix routing or network reachability. The VM must still be able to reach the share endpoint through the network used by the Share service.
Open the Shares page
Log in to Horizon and select the correct project. To open the Shares page, use the following navigation path:
Project → Share → Shares
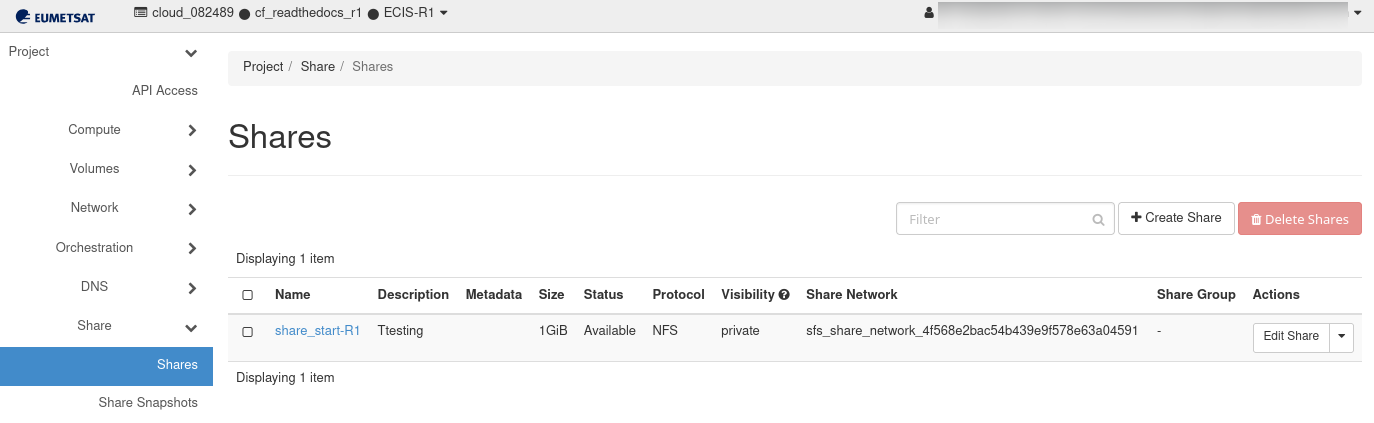
Shares page in Horizon.
The Shares page lists all shares that already exist in the selected project.
Start creating a share
On the Shares page, click Create Share.
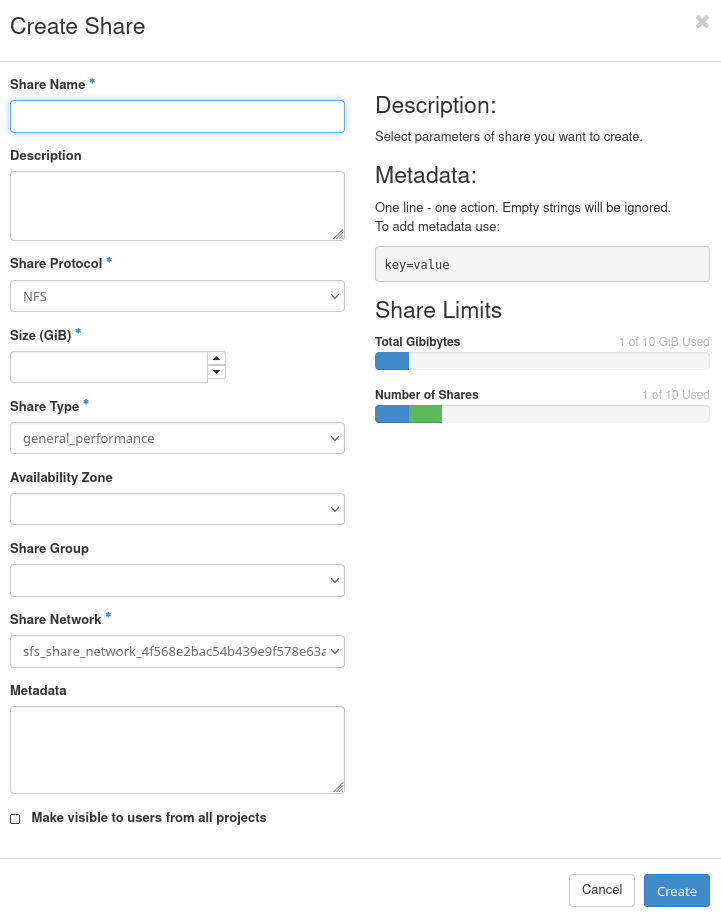
Create Share window.
The Create Share window opens. The left side of the window contains the fields used to define the share. The right side shows a short description, metadata format, and current share quota usage.
Create Share fields
The Create Share window contains several fields. Some fields are required, while others are optional or depend on the cloud configuration. For the standard workflow in this article series, create an NFS share, use the available sfs_share_network_ network, and keep the share private to the current project.
Description
The Description field is optional. Use it to describe what the share is used for, especially in projects where several users can create or manage storage resources.
For example:
Shared NFS storage for processing output from VM workers.
or:
Common directory for application configuration files.
The description appears in the Shares table, so it can help other project users understand the purpose of the share without opening its details page.
Share Protocol
The Share Protocol field defines the file-sharing protocol used by the share.
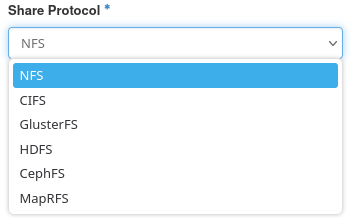
Available share protocols.
Important
The only supported protocol at the time of this writing, is NFS.
After the share is created and access is allowed, Horizon provides an NFS export location. You will later use that export location when mounting the share inside the VM. A typical NFS export location has the following form:
share-server-address:/share-path
Although Horizon may display several protocol options, the presence of a protocol in the dropdown does not necessarily mean that it is configured, supported, or recommended in the current cloud environment. The available backend configuration, share type, network setup, and cloud operator policy determine which protocols can actually be used.
For the standard share workflow in this documentation, continue with NFS.
Size (GiB)
The Size (GiB) field is required. Enter the size of the share in gibibytes. For practical purposes, you can treat 1 GiB as approximately 1 GB of storage.

Available memory for Shares
For example, enter 1 to create a share with a size of 1 GiB. Choose the size according to the amount of data you expect to store. The selected size consumes your project share quota. In the example shown in the window, the total quota is 10 GiB, and the maximum number of shares is 10.
Share Type
The Share Type field is required.
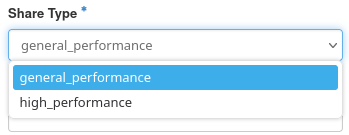
Available Share Types
A share type defines the storage profile used for the share. It is configured by the cloud operator and may represent a specific backend, performance level, or service class.
In this environment, the available share types are:
general_performance – based on hdd devices, and
high_performance, which is a flash based solution.
For the basic NFS share workflow in this article series, use general_performance.
Availability Zone
The Availability Zone field defines where the share should be created, if several availability zones are available. In many environments this field can be left empty or set to the default value. The Share service then selects the appropriate availability zone automatically.
Select a specific availability zone only if your environment requires it or if the documentation for your cloud instructs you to do so.
Share Network
The Share Network field is required.

Available Share network
A share network defines the network configuration used by the Share service to make the share reachable. The virtual machine that mounts the share must be able to reach the share endpoint provided through this network.
In the example, the selected share network has a name similar to:
R1 sfs_share_network_4f568e2bac54b439e9f578e63a04591 R2 sfs_share_network_2df1bbb8e61e446696ed17bdfe3999d5
The exact value in your environment may be different. If only one share network is available, leave the preselected value. If several share networks are available, choose the one that corresponds to the network from which your virtual machines will access the share.
Selecting the wrong share network may result in a share that is created successfully but cannot be mounted from the intended VM.
Metadata
The Metadata field is optional. Metadata can be used to attach key-value information to the share. This can help with organization, automation, or internal classification.
The expected format is one metadata entry per line:
key=value
For example:
purpose=processing
owner=project-team
environment=test
Empty lines are ignored. Use metadata only if your workflow requires it. For normal manual share creation, this field can be left empty.
Make visible to users from all projects
The Make visible to users from all projects option controls whether the share is visible outside the current project. For normal project usage, leave this option unchecked.
A share should usually remain private to the project where it was created. Making a share visible to users from all projects is an administrative or special-purpose action and should be used only when there is a clear reason.
This option does not replace access rules. Even if a share is visible, access to the share still depends on the access configuration supported by the Share service.
Description and metadata help
The right side of the Create Share window contains explanatory text. The Description section explains that this window is used to select the parameters of the share you want to create.
The Metadata section shows the expected metadata format:
key=value
Each metadata entry must be entered on a separate line. Empty strings are ignored.
Review share details
Click the share name to open the share details page. The details page shows information about the share, including its size, protocol, status, visibility, share network, and export location.
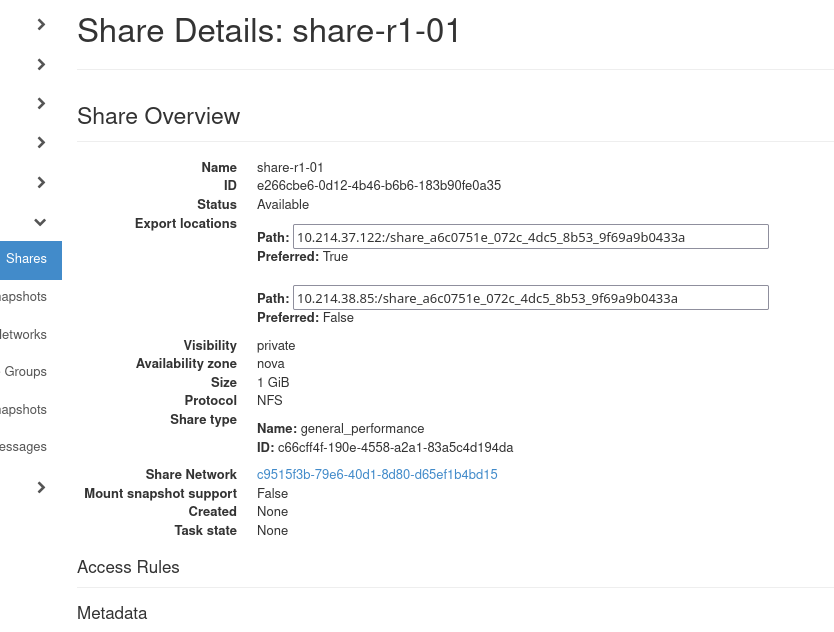
Share details
The export location is important later, because it is used when mounting the share from a Linux virtual machine.
Troubleshooting
If the share is not created successfully, check the following:
The Share Name field is not empty.
The Size (GiB) value is within the remaining quota.
The selected Share Type is valid for the project.
A valid Share Network is selected.
The project has not reached the maximum number of shares.
The User Messages page does not contain a share service error.
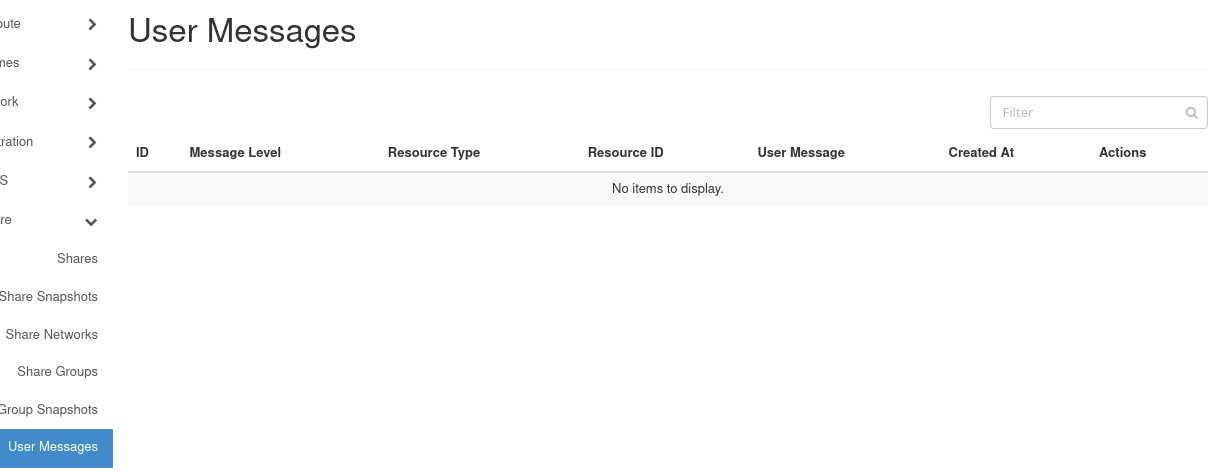
User Messages page for share-related errors.
The User Messages page may provide additional information if share creation fails.
What to do next
After creating the share, continue with the article on allowing access to it: